Showing posts with label Tutorial. Show all posts

Friday, 9 May 2014

Eye Glasses Cover

I love to crochet for ma… as she cherishes all my creations and whatever I have made for her until now she has treasured it … and I literally mean ‘Treasured’ … as the crocheted piece goes into one neatly packaged sheet of plastic and into her armoire which comes out only after my constant reminders that ‘have you put that particular crocheted object to use’ and only to go back again in her cupboard in a rather new dust free packing … ha ha ha


So the tough part is going to be to get her to put to use what I make for her … this eye glass cover which has room for a pen along with her reading glasses for her frequent bank visits. (I hope ma is reading this n gets what I am hinting at …)


Here's the pattern if you want to make one 


What you’ll need


Yarn: Laura Knitting Cotton (1 Ball , 50gms)
Hook size: 3.5 mm Boye

Stitches Used
Ch= chain
Sl st = Slip Stitch
Sk= Skip
Sp = Space
Sc = Single Crochet
Dc = Double Crochet


Pattern:

Ch 21


Row 1: In the third ch from the hook ( skipped ch2 count as first sc ) make *[ 1sc, ch1, 1dc sk 2ch ] repeat from * with 1sc in the last ch.


Row 2: Ch 1 turn, sk first dc, in the ch1 sp make *[ 1sc, ch1, 1dc] making * in every ch1 sp from the previous row with 1sc in top ch of the starting ch2.


Row 3: Ch 1 turn, sk first dc, in the ch1 sp make *[ 1sc, ch1, 1dc] making * in every ch1 sp from the previous row with 1sc in last turning ch 1.

Row 4-59: Repeat Row 3

Row 60: Ch 1 turn, sk first dc, in the following 2 ch1 sp make [ 1sc, ch1, 1dc], in the next ch sp 1sc ch4 and 1sc in next ch1 sp ( this is to make the button hole), again in the following 2 ch1 sp make [ 1sc, ch1, 1dc], with 1sc in last turning ch 1.

Row 61: Ch 1 turn, sk first dc, in the following 2 ch1 sp make [ 1sc, ch1, 1dc], in the ch1 sp between the sc made in ch4 sp make [ 1sc, ch1, 1sc] twice, again in the following 2 ch1 sp make [ 1sc, ch1, 1dc], with 1sc in last turning ch 1.

Row 62: Repeat Row 3

After completion of row 62 contine with the same yarn and sc along all four sides of the piece 3 sc making the corners.[1sc for each row means 62 sc  for each length and  19 sc for each width and 1extra sc on each corner making a 3sc corner]

Fold the piece till row 54 and sew along the sides with whip stitch making a 6 row flap for the cover with the button hole.


Sew the button aligned with the button hole.


I really liked working with wattle stitch. 


The simple combination of single crochet chain 1 and double crochet is super easy and gives beautiful texture to the woven material. I am tempted to make one for me as it’s also a perfect size to hold crochet hooks making it a hook case instead of eye glass cover.


Please excuse the indoorsy pictures (not in sunlight), as the tutorial was done in evening after getting back from work to get this ready before weekend.

Happy Crocheting and hope you all have a great weekend with family.
Benu

Saturday, 3 May 2014

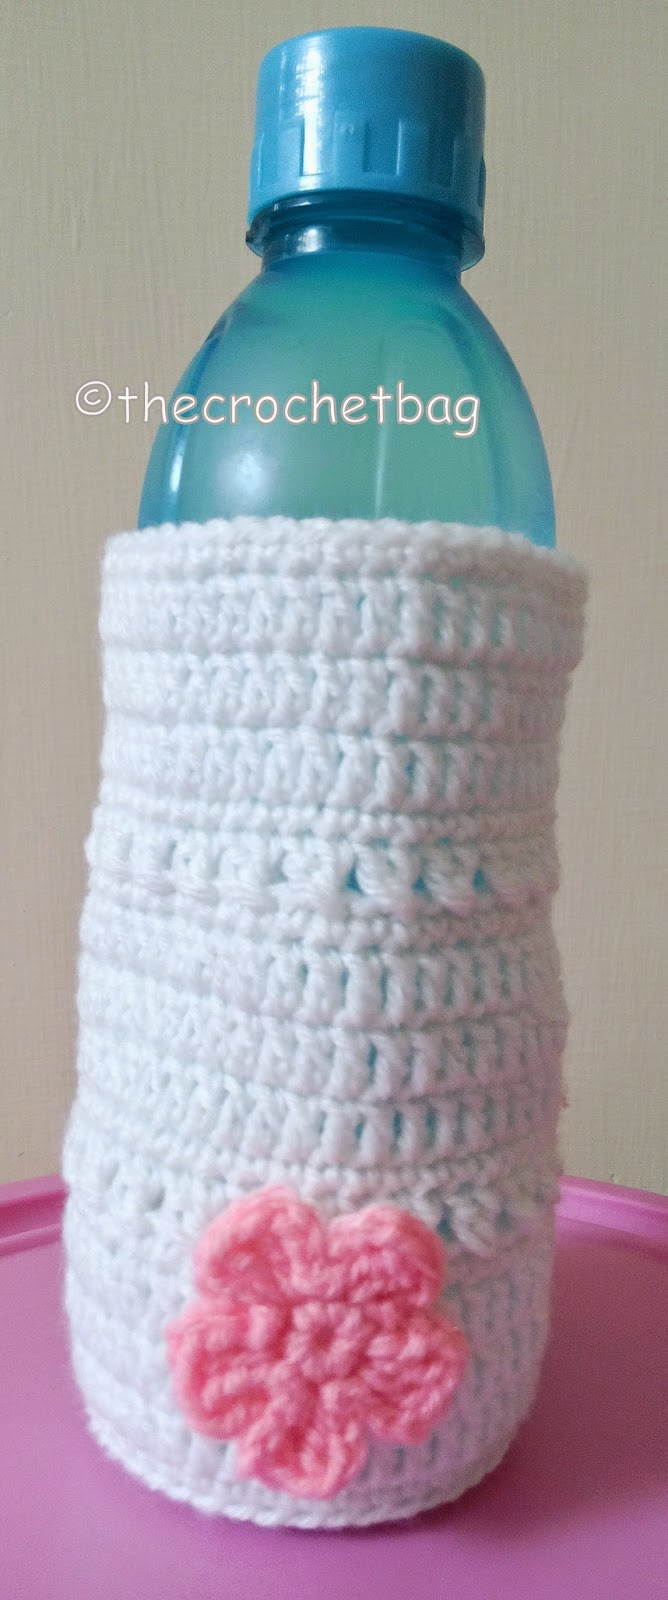
Water Bottle Cozy

It’s officially summer in India and that means you have to stay hydrated. As essential as it is to carry around a cold water bottle when one is on the move, it’s a nuisance when it starts dripping in the carry bag.


Hence a water bottle cozy that will take care of the condensation as well as will keep the water cooler for longer.


Things you’ll need:


Yarn: White Acrylic yarn
Hook size: 3.00 mm Pony

Stitches Used
Ch= chain
Sl st = Slip Stitch
Sc = Single Crochet
Dc = Double Crochet
Cdc = Crossed Double Crochet


Pattern:
Ch 5, sl st to form a ring.

Round 1. Ch3, 14 dc into the ring. Join with a sl st to the top ch of the ch 3. (15 dc)

Round 2. Ch3, 1 dc in the same spot. 2dc in each of the dc in the previous round. Join with a sl st to the top ch of the ch 3. (30 dc)

Round 3. Ch3, 2 dc in the next,*[1 dc , 2dc in the next] repeat from * till end. Join with a sl st to the top ch of the ch 3. (45 dc)


Round 4. Ch1,(working in back loop only) 1 sc in the same spot, 1sc in each of the dc from the pevious round. Join with a sl st.(45 sc)

Round 5-7. Ch3, 1 dc in each of the sc from the previous round. Join with a sl st to the top ch of the ch 3. (45 dc)

Round 8. Ch1, 1 sc in the same spot, 1sc in each of the dc from the pevious round. Join with a sl st.(45 sc)

Round 9. Ch3, *[sk next st 1 dc in the next, 1dc in st that you skipped making a cross] repeat from * till end. Join with a sl st to the top ch of the ch 3.

You can learn more about Crossed Double Crochet stitch here

Round 10. Ch1, 1 sc in the same spot, 1sc in each of the dc from the pevious round. Join with a sl st.(45 sc)


Repeat round 5-10 once
Repeat round 5- 8 once

Fasten off.
Emblish it with a crocheted flower/ button.


Though this pattern is made to fit my bottle, you can easily make it fit yours by just increasing/ decreasing the number of dc in the base circle.


Make your water bottle one of a kind !


Happy Crocheting !!!
Benu

Tuesday, 29 April 2014

Cell Phone Cozy in Grit Stitch


This super easy cell phone cozy has been made to order to fit Micromax A114 Canvas 2.2 having Body Dimension of 145x73x9.7 mm (5.71x2.87x0.38 in). {If in case you are wondering, Yes I was just given the model number and I went ahead and got the dimensions, cut out a cardboard of that size n made the cover to fit the cardboard.}

The cover uses just single crochet stitches with a bit of variation (making it Grit stitch) and is a super easy project for a beginner.


What you’ll need:


Yarn: Variegated Color (Lily Sugar n Cream)
Hook size: 4.25 mm Boye

The recommended hook size with Lily Sugar n Cream is H/5.00 mm but I used 4.25 to get a snug fit which is always a good idea with cell phone, iPad and laptop covers.


Abbreviations used:
Ch= chain
Sl st = Slip Stitch
Sc = single crochet


Pattern:

Row 1. Ch13, from the second ch from the hook sc in each chain with 3sc in last ch, and 1sc in each ch on the opposite side and 2sc in the last ch. Join with a sl st with the first sc. (26 sc)

Row 2. Ch1, 1 sc in the same spot and 1sc in each of the next 11 sc, 2sc in the next sc, 1 sc in each of the next 12 sc and 2sc in the next sc. Join with a sl st with the first sc. (28 sc)

Row 3. Ch1, 2 sc in the same spot, *[skip next sc and 2 sc in the next] repeat from * till the end. Join with a sl st with the first sc.(28 sc in sets of 2 or 14 sets of 2sc)

Row 4-25. Ch1,2sc in the next sc, *[skip next sc and 2 sc in the next] repeat from * till the end. Join with a sl st with the first sc. (14 sets of 2sc)

Row 26-27. Ch1, 1 sc in the same spot and 1sc in each of the next sc’s from the previous round. Join with a sl st with the first sc. (28sc)


Though this pattern is made to fit the above mentioned model, I am sure it can be modulated for any model by just increasing/ decreasing the number of starting chain and row count. Just keep in mind that since you will be using Grit Stitch, all you need to do is to keep an even count of sc at the end of row 2.


You can learn more about how to do Grit Stitch here.


Happy Crocheting !!!
Benu


Thursday, 24 April 2014

Cherry on Top Cake Recipe


What you’ll need


Hook size:3.00 mm Pony


Abbreviations:

Ch = Chain
Sc = Single Crochet
Hdc = Half  Double Crochet
Dc = Double Crochet
Rnd = Round/ Row
Sl St = Slip Stitch

Pattern:

Cherry (worked in red yarn)


Ch 2
Rnd1:  6 sc in the second ch from the hook. Do not join and work in continuous rounds. (6sc)
Rnd2:  2sc into each sc from the previous round. (12sc)
[Do attach a stitch marker to the first sc of the 2sc set to mark the beginning of the round]
Rnd3:  1sc in each sc of the previous round (again marking the round beginning with a stitch marker). (12sc)
Rnd4:  1sc in each sc of the previous round. (12sc)
Rnd5:  sc2tog 6 times (6sc).
Fasten off and sew in the ends
Now turn the cherry inside out the sides with v type stitches being on the inside.


Frosting (worked in white yarn)   


Chain 3, join with a sl st to form ring.
Rnd1:  ch1 ,6 sc into the ring, join with a sl st to the first sc (6sc).
Rnd2:  ch1,2sc into each sc from the previous round,Join with sl st to first sc (12sc).
Rnd3:  ch1,1sc into the same spot *[2sc in the next sc,1sc in the next sc] repeat from *till end, Join with sl st to first sc (18sc).
Rnd4:  ch1,* [1sc 1hdc in the same spot , ch1 1hdc 1sc in the next sc, sl st into the next stitch], repeat from * till the end, Join with sl st to first sc (6 petals formed).
Fasten off.  

I glued the cherry onto the frosting (if you want to add a bead onto the cherry you should do it here before gluing on both onto the fondant for me it was a last minute thought so I had to unglue it and glue it back again) and then both onto the fondant with the help of fabric glue, though you can easily sew them too if you like.

Fondant (worked in pinkish yarn)


Chain 3, join with a sl st to form ring.
Rnd1:  ch1 ,6 sc into the ring, join with a sl st to the first sc (6sc).
Rnd2:  ch1,2sc into each sc from the previous round,Join with sl st to first sc (12sc).
Rnd3:  ch1,1sc into the same spot *[2sc in the next sc,1sc in the next sc] repeat from *till end, Join with sl st to first sc (18sc).
Rnd4:  ch1, 1sc into the same spot , 1 sc in the next sc *[2sc in the next sc,1sc in each of the next 2sc] repeat from *till end, join with a sl st to the first sc (24sc).
Rnd5:  ch1, 1sc into the same spot , 1 sc in each of the next 2sc *[2sc in the next sc,1sc in each of the next 3sc] repeat from *till end,  join with a sl st to the first sc (30sc).
Rnd6:  ch1, 1sc into the same spot , 1 sc in each of the next 3sc *[2sc in the next sc,1sc in each of the next 4sc] repeat from *till end, join with a sl st to the first sc (36sc).
Rnd7:  ch1, 1sc into the same spot , 1 sc in each of the next 4sc *[2sc in the next sc,1sc in each of the next 5sc] repeat from *till end, join with a sl st to the first sc (42sc).
Rnd8:  ch1, 1sc into the same spot , 1 sc in each of the next 5sc *[2sc in the next sc,1sc in each of the next 6sc] repeat from *till end, join with a sl st to the first sc (48sc).
Rnd9:  ch1, 1sc into the same spot , 1 sc in each of the next 6sc *[2sc in the next sc,1sc in each of the next 7sc] repeat from *till end, join with a sl st to the first sc (54sc).
Rnd10: ch1, 1sc into the same spot , 1 sc in each of the next 7sc *[2sc in the next sc,1sc in each of the next 8sc] repeat from *till end, join with a sl st to the first sc (60sc).
Rnd 1 to 10 are same in fondant and the sponge cake piece
Rnd11: ch1, 1sc into the same spot , 1 sc in each of the next 8sc *[2sc in the next sc,1sc in each of the next 9sc] repeat from *till end, join with a sl st to the first sc (66sc).
Rnd12: ch1, (working in back loop only for this round)1sc into the same spot , 1 sc in each of the sc from the previous round till the end, join with a sl st to the first sc (66sc).
Rnd13: ch2, 1hdc into the next stitch and 1hdc in each of the sc from the previous round till the end, join with a sl st to the top ch of the ch 2 (66hdc).
Rnd14: ch1, 1sc into the same spot , 1 sc in each of the sc from the previous round till the end, join with a sl st to the first sc (66sc).
Rnd 12 to 14 were done to give the icing done with piping bag look on the border of the fondant, another good idea would be to use star stitch here …
Rnd15: ch1, 1sc into the same spot, *[ ch 1, skip 2 sc, in the next sc (1 dc ch1 , 1 dc ch1,1 dc ch1,1 dc ch1, 1 dc ch1) skip 2sc and 1sc in the next sc] repeat from *till end, join with a sl st to the first sc .( 11 petals formed).
Fasten off.


Sponge Chocolate Cake (worked in chocolate yarn)


Chain 3, join with a sl st to form ring.
Rnd1:  ch1 ,6 sc into the ring, join with a sl st to the first sc (6sc).
Rnd2:  ch1,2sc into each sc from the previous round,Join with sl st to first sc (12sc).
Rnd3:  ch1,1sc into the same spot *[2sc in the next sc,1sc in the next sc] repeat from *till end, Join with sl st to first sc (18sc).
Rnd4:  ch1, 1sc into the same spot , 1 sc in the next sc *[2sc in the next sc,1sc in each of the next 2sc] repeat from *till end, join with a sl st to the first sc (24sc).
Rnd5:  ch1, 1sc into the same spot , 1 sc in each of the next 2sc *[2sc in the next sc,1sc in each of the next 3sc] repeat from *till end,  join with a sl st to the first sc (30sc).
Rnd6:  ch1, 1sc into the same spot , 1 sc in each of the next 3sc *[2sc in the next sc,1sc in each of the next 4sc] repeat from *till end, join with a sl st to the first sc (36sc).
Rnd7:  ch1, 1sc into the same spot , 1 sc in each of the next 4sc *[2sc in the next sc,1sc in each of the next 5sc] repeat from *till end, join with a sl st to the first sc (42sc).
Rnd8:  ch1, 1sc into the same spot , 1 sc in each of the next 5sc *[2sc in the next sc,1sc in each of the next 6sc] repeat from *till end, join with a sl st to the first sc (48sc).
Rnd9:  ch1, 1sc into the same spot , 1 sc in each of the next 6sc *[2sc in the next sc,1sc in each of the next 7sc] repeat from *till end, join with a sl st to the first sc (54sc).
Rnd10: ch1, 1sc into the same spot , 1 sc in each of the next 7sc *[2sc in the next sc,1sc in each of the next 8sc] repeat from *till end, join with a sl st to the first sc (60sc).
Rnd11- Rnd 25: ch1, 1sc into the same spot , 1 sc in each of the sc from the previous round till the end, join with a sl st to the first sc (60sc).
Fasten off.


Ta da … your cake is ready …

Enjoy !!!
Benu

Thursday, 3 April 2014

Pen Drive Charm

My Pen Drive which I keep losing around the house …


Yarn Scrap heart charm which can be whipped in no time …


Result


Duo made in heaven … ha ha ha

A closer look


Hook: 3.5 mm

Yarn: Laura Knitting Cotton (from Pradhan Embroidery Store

Abbreviations:
Chain = ch
Slip Stitch = sl st
Single Crochet = sc
Half Double Crochet = hdc
Double Crochet = dc
Treble Crochet = tr

Pattern:
1.     Ch 4, Join with a sl st to form a ring.
2.    Ch 3 (count as 1st dc) and make 10 dc into the ring, Join with a sl st to the top chain of ch3. (11dc)
3.    Ch 3(count as 1st dc) 3 tr in the same spot, 1 tr in the next, 1dc 1hdc in the next,2 sc in the next, 1sc 1dc 1sc in the next, 2 sc in the next,1hdc 1 dc in the next, 1 tr in the next, 3 tr in the next and ch 3 and join with a sl st in the same spot.
4.    Ch 25 (or ch for the desired length of the charm) and sl st to the center or join with an invisible join.
2.    Sew in the ends at the back.


I found the charm's use with the flash drive ... though you can use it with keychains, backpacks, purses  ... 


Enjoy Crocheting !!!
Benu

Tuesday, 1 April 2014

Coin Purse


Hello Friends,


How are you all?  I am sorry that I have been away for such … such a long time.  It has been a combination of things that kept me away from my blog though I have been posting pictures of my creation on my Facebook page. Hoping I am able to be here on my blog as frequently as I wish.


Here's the pattern for the Coin Purse ...


Hook Size: E/4 3.5 MM

Ch/Chs = Chain/Chains
Sl st = Slip Stitch
Sc = Single Crochet
Dc = Double crochet
sc 2 tog = Single Crochet 2 together.


Chain 11.


Rnd1: In the second ch from the hook sc in each ch till the end with 4sc in last ch , 1 sc in each of the     remaining chs on the opposite side with 3 sc in the last ch, join with a sl st to the first sc. ( 24 sc)
Rnd2: Ch 1, 1 sc in each of the next 10 sc, 2sc in next 2sc , 1 sc in each of the next 10 sc , 2sc in next 2sc, join with a sl st to the first sc.( 28 sc)
Rnd3: Ch 1, 1 sc in each of the next 10 sc, 2sc in next sc, 1 sc in each of the next 2 sc, 2sc in next sc, 1 sc in each of the next 10 sc, 2sc in next sc, 1 sc in each of the next 2 sc, 2sc in next sc, join with a sl st to the first sc.(32 sc)
Rnd4: Ch 1, 1 sc in each sc around, join with a sl st to the first sc.(32 sc)


Rnd5: Ch3(count as 1 dc) 1 dc in the same spot,* [skip 1 sc and 2dc in next sc] , repeat from * till end, join with a sl st to the top chain of the first ch 3 (counted as a dc).(32 dc that is 16 pairs)
Rnd6- 9: Sl st again in the middle of the ch3 and 1dc and ch3 (count as 1 dc) 1 dc in the same spot, similarly make 2dc in between each of the 2dc set from previous row {this would make the V stitch in dc}, join with a sl st to the top chain of the first ch 3 (counted as a dc).(32 dc that is 16 pairs)
This would make 5 rows / rounds in V stitch
Rnd10: Ch 1 and 1sc in the top ch of first ch3, 1sc in each dc around, join with a sl st to the first sc.(32 sc)
Rnd11: Ch 1, 1 sc in each sc around, cut and join with an invisible join to the first sc.(32 sc)

Row1: Finding the center ( for me it was 3rd sc from the join as the V stitch dc work tends to slant) join yarn ch 1 and 1 sc in the same spot, 1 sc in each of the next 5sc, ch1 turn. (6 sc)
Row2-5: [1sc in each sc across, ch1 turn. (6 sc)] x 4.
Row6: 1sc, sc 2 tog ch3(you can ch 3/4 depending on the button hole size you want), sc 2 tog, 1sc, ch1 turn.
Row7: sc 2 tog, 3 sc in the ch 3 space, sc 2 tog, ch1 and join to the base of the sc with a sl st.
(This is for the edging around the purse)

Continuing with the same yarn ch2 sk 1 sc and sl st in the next around on the sides of the flap and around on the edging of the purse ending where you began and joining again with an invisible join.
Attach a button or a bead where the button hole is.


Enjoy Crocheting !!!
Benu


Tuesday, 13 August 2013

Candy Container

A simple single crochet storage container… this being really small will be used to store my candy stock …


Yarn Used: Coffee Color for Rs40/100gms
Hook: US E-4 / 3.50 mm

Ch = Chain
Rnd(s) = Round(s)
Sc = Single crochet
Sl st = Slip stitch
Revsc = Reverse Single Crochet (Crab Stitch Reverse Single Crochet Edging Border)


Pattern:-
Ch 4,Join to form a ring.
1st rnd: Ch 1, 8 sc in ring. Join with sl st to the first sc. (8 sc).
2nd rnd: Ch 1, 2 sc in same spot, *[2 sc in next sc]. Rep from * around. Join with sl st to the first sc. (16 sc).
3rd rnd: Ch1, 1 sc in same spot, 2 sc in next sc ,*[1 sc in next sc ,2 sc in next sc]. Rep from * around. Join with sl st to the first sc. (24 sc).
4th rnd: Ch 1, 1 sc in same spot, 2 sc in next sc *[1 sc in each of next 2 sc, 2 sc in next sc]. Rep from * around with 1 sc in last sc. Join with sl st to the first sc. (32 sc).
5th rnd: Ch 1, 1 sc in same spot, 1 sc in each of next 2 sc, 2 sc in next sc, *[1 sc in each of next 3 sc, 2 sc in next sc]. Rep from * around. Join with sl st to the first sc. (40 sc).
6th rnd: Ch 1, 1 sc in same spot, 1 sc in each of next 3 sc, 2 sc in next sc, *[1 sc in each of next 4 sc, 2 sc in next sc]. Rep from * around. Join with sl st to the first sc. (48 sc).
7th rnd: Ch 1, 1 sc in same spot, 1 sc in each of next 4 sc, 2 sc in next sc, *[1 sc in each of next 5 sc, 2 sc in next sc]. Rep from * around. Join with sl st to the first sc. (56 sc).
8th rnd: Ch 1, 1 sc in same spot, 1 sc in each of next 5 sc, 2 sc in next sc, *[1 sc in each of next 6 sc, 2 sc in next sc]. Rep from * around. Join with sl st to the first sc. (64 sc).
9th rnd: Ch 1, 1sc in each sc throughout in the back loops only. Join with sl st to the first sc. (64 sc).


10th - 22nd rnd: Ch 1, 1sc in each sc throughout. Join with sl st to the first sc. (64 sc).


23rd rnd: Ch 1, 1 revsc in each sc throughout. Join with sl st to the first sc. (64 sc).


Happy Crocheting !!!

Benu

Hi! Thanks for visiting my blog. I hope you enjoyed reading through it. I’d love to hear any comments you have about the blog – good or bad – or anything else you want to say.

Related Posts Plugin for WordPress, Blogger...